
Introduction
If you're someone who loves to accessorize with headbands, you're going to love this DIY headband kit tutorial. Not only is it a fun and creative way to make your own headbands, but it's also a great way to save money. In this tutorial, we'll show you how to make your own headbands with just a few simple steps.
Materials
- Headband material in kit
- Elastic in kit
- Scissors
- Pins
- Thread
- Sewing machine
Instructions
-
Start by using the correct needle and presser foot. You will want to use a needle that says "Ball Point" or "Jersey".

-
Next you want to fold your fabric lengthwise, with right (the side you want to see at the end) together. Pin along the long edge.

-
You will want to have your machine set to a mid length zigzag stitch, this allows your fabric to stretch without snapping the thread. Sew along the pinned length of your fabric approx 1/4" from the edge. Be sure to back stitch a few stiches at the beginning and end to anchor your stitches. Remove your pins before you sew over them.

-
Next you will turn your tube right side out. You can use a safety pin to help you turn the the ends by attaching the pin to one end and pushing it through the tube.
-
Once you've turned your tube, center the seam on what will be the back side. When laid flat you will have one side with no seam visible and the other with the seam in the centre.

-
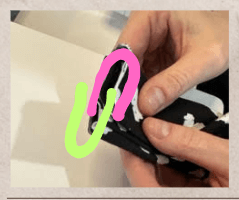
Fold your flat tube in half, so your short sides are together. Align your seam (green line) with the bottom right edge (pink line)

- Fold the sides so they wrap around your overlapped section. Sew across with the 1/4" seam allowance you have been using all along remembering to backstitch to secure your stitching.